Triggered Events and Notices 2.3

Abstract

Improvements to the Triggered Events interface enables you to easily filter, sort, and print triggered events from the patron’s account or an item’s details. This feature is especially useful when tracking notice completion from a patron’s account.

Table of Contents

  • Access and View
  • Filter
  • Sort
  • Print
  • Reset

Access and View

You can access Triggered Events from two Evergreen interfaces: a patron’s account or an item’s details.

To access this interface in the patron’s account, open the patron’s record and click OtherTriggered Events.

To access this interface from the item’s details, enter the item barcode into the Item Status screen, and click Actions for Selected ItemsTriggered Events.

Information about the patron, the item, and the triggered event appear in the center of the screen. Add or delete columns to the display by right clicking on any column. The Column Picker appears in a pop up box and enables you to select the columns that you want to display.

Triggered_Events_and_Notices1

Filter

The triggered events that display are controlled by the filters on the right side of the screen. By default, Evergreen displays completed circulation events. Notice that the default filters display Event State is Complete and Core Type is Circ.

To view completed hold-related events, such as hold capture or hold notice completion, choose Event State is Complete and Core Type is Hold from the drop down menu.

You can also use the Event State filter to view circs and holds that are pending or have an error.

Add and delete filters to customize the list of triggered events that displays. To add another filter, click Add Row. To delete a filter, click the red X adjacent to a row.

Triggered_Events_and_Notices2

Sort

You can sort your results by clicking the column name.

Triggered_Events_and_Notices3

Print

You can select the events that you want to print, or you can print all events. To print selected events, check the boxes adjacent to the events that you want to print, and click Print Selected Events. To print all events, simply click Print All Events.

Reset

If the triggered event does not complete or the notice is not sent and the trigger needs to be run again, then select the event, and click Reset Selected Events.

Author: Sally Fortin, Equinox Software

Print Friendly
Posted in Uncategorized | Leave a comment

Print Holds Slip with Landscape Layout 2.3

This feature is available in Evergreen version 2.3.

This feature enables you to use Mozilla-specific CSS to print holds with a landscape layout. To use the landscape layout:

1) Click AdminWorkstation AdministrationReceipt Template Editor.

2) Select hold transit slip from the Template Name drop down menu.

3) Enter <div> before and after the block of text that you wish to rotate.

4) Enter the stylesheet text in the <div> bracket that appears before the block of text that you wish to rotate:

<div style = moz-transform: rotate(90deg);”>

5) When you click out of this box, notice that the text in the Preview box on the left side of the screen has rotated 90 degrees.

6) You can further customize the look of the text by adjusting its height and width. The height and width that you specify will be unique to your printer. For example, you could add the following height and width to your rotated text:

<div style = moz-transform: rotate(90deg);height: 300px; width: 200px;”>

Print_Holds_Slip1

7) The holds slip will print with the configured text in a landscape layout:

Print_Holds_Slip2

Author: Sally Fortin, Equinox Software

Print Friendly
Posted in Uncategorized | Leave a comment

Expanding the Work Log 2.3

This feature is available in Evergreen version 2.3.

In versions of Evergreen prior to 2.3, the work log recorded check ins, checkouts, patron registration, patron editing, and renewals. In version 2.3, the work log also records holds that have been placed and payments that have been received.

In this example, a staff member has collected a fine from a patron.   To view this action in the work log, click AdminLocal AdministrationWork Log.  By default, the work log will record the staff member’s username, the amount that was received, the payment type, the patron’s barcode, and the patron’s last name.

Expanding_the_Work_Log1

In this example, a staff member has placed a hold for a patron.  To view this action in the work log, click AdminLocal AdministrationWork Log.  By default, the work log will record the staff member’s username, the hold type, the patron’s barcode, and the patron’s last name.

Expanding_the_Work_Log2

Author: Sally Fortin, Equinox Software

Print Friendly
Posted in Uncategorized | Leave a comment

Kids OPAC 2.3

The Kids OPAC is available in Evergreen version 2.3.

Abstract

The Kids OPAC (KPAC) is a public catalog search that was designed for children and teens. Colorful menu items,large buttons, and simple navigation make this an appealing search interface for kids.

Librarians will appreciate the flexible configuration of the KPAC. Librarians can create links to canned search results for kids and can apply these links by branch. The KPAC uses the same infrastructure as the Template Toolkit OPAC (TPAC), the adult catalog search, so you can easily extend the KPAC using the code that already exists in the TPAC. Finally, third party content, such as reader reviews, can be integrated into the KPAC.

Table of Contents

  • Choose a Skin
  • Search the Catalog
  • Place a hold
  • Save Items to a List
  • View Third Party Content
  • Use Configuration Files

Choose a Skin

Two skins, or design interfaces, have been created for the KPAC. The KPAC was designed to run multiple skins on a single web server. A consortium, then, could allow each library system to choose a skin for their patrons.
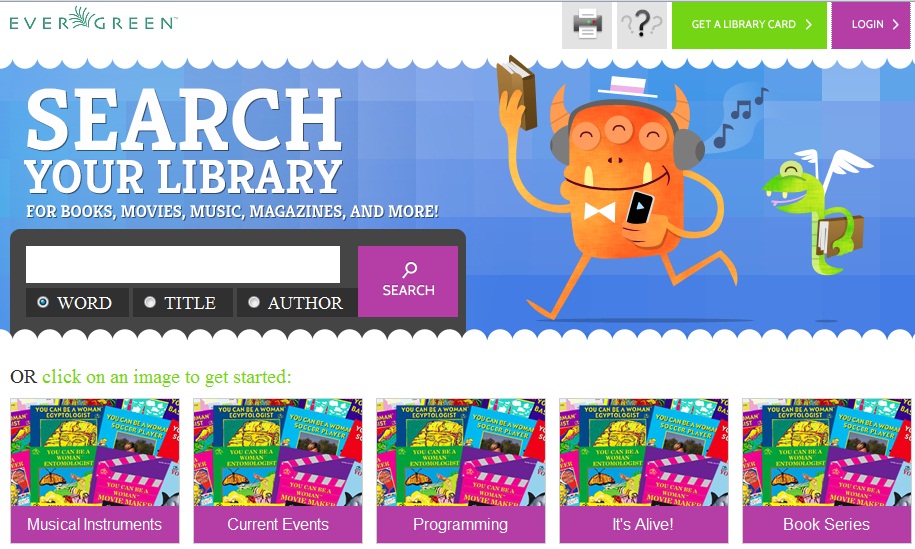
Monster Skin:

In this skin, the search bar shares the top panel with a playful monster. The search grid appears beneath the search bar. Help and Login links appear in bold colors at the top right of the interface although you can customize these with CSS. After you login, the Login button disappears.
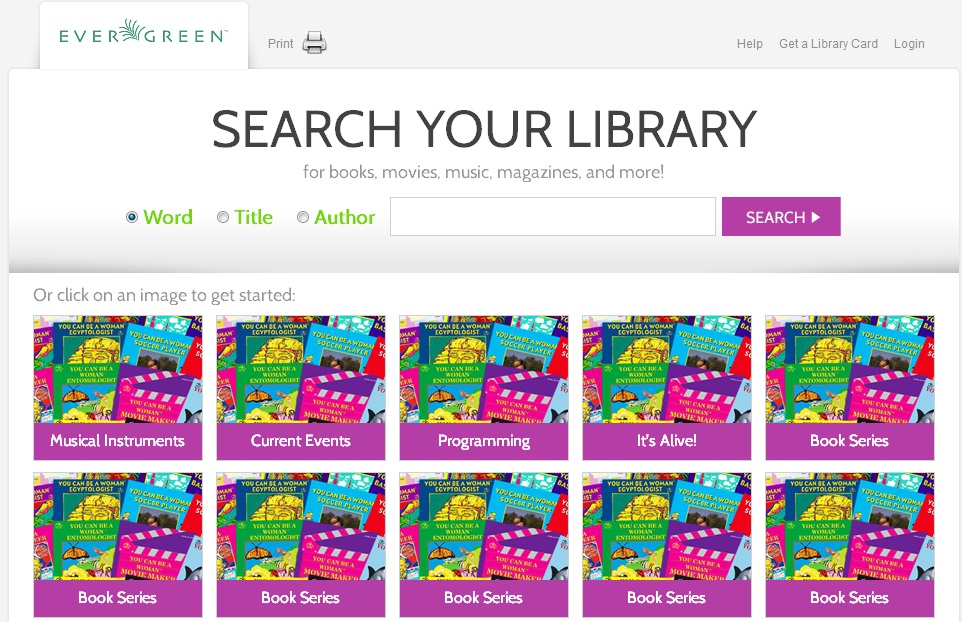
Kids_OPAC2

Alternate Skin:

In this skin, the search bar is the focal point of the top panel and is centered on the screen. The search grid appears beneath the search bar. Help and Login links appear at the top right of the interface. You can customize the appearance and position of these links with CSS. After you login, the user name is displayed in the top right corner, and the Login link becomes an option to Logout.

Kids_OPAC1

Search the Catalog

You can search the catalog using the search bar, the search grid, or the search bar and the collection drop down menu.

Search using the Search Bar

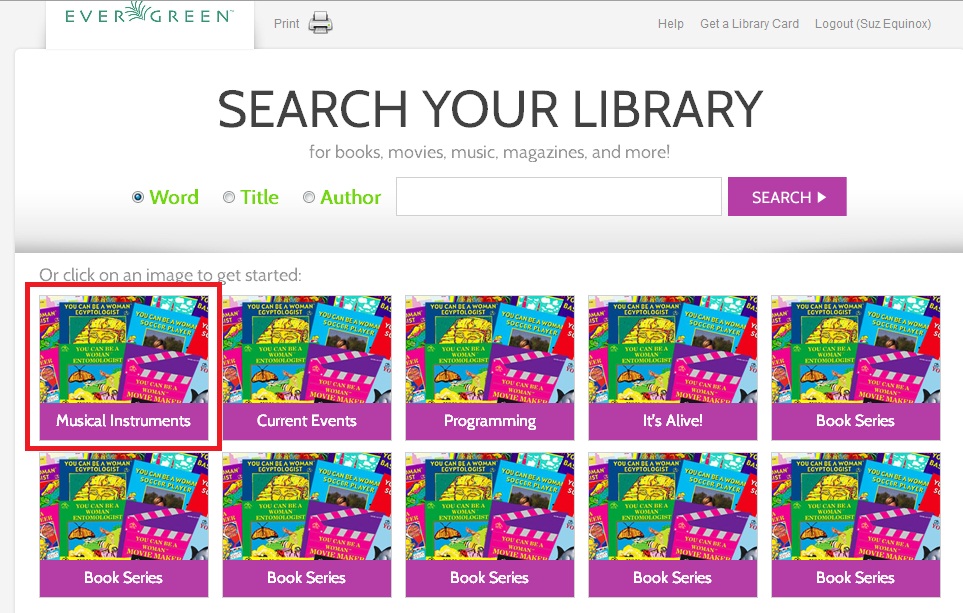
To search the catalog from the home page, enter text into the search bar in the center of the main page, or enter text into the search bar to the right of the results on a results page. Search indices are configurable, but the default search indices include author, title and (key)word.

You can use this search bar to search the entire catalog, or, using the configuration files, you can apply a filter so that search queries entered here retrieve records that meet specific criteria, such as child-friendly copy locations or MARC audience codes.

Search using the Grid

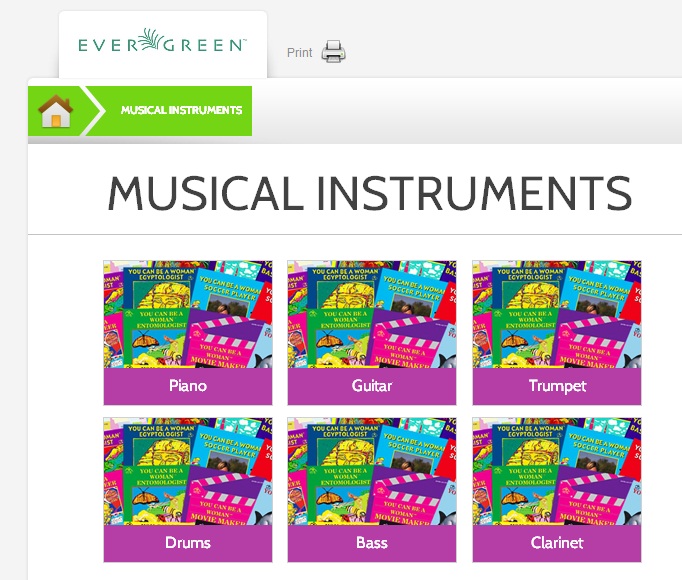
From the home page, you can search the catalog by clicking on the grid of icons. An icon search can link to an external web link or to a canned search. For example, the icon, Musical Instruments, could link to the results of a catalog search on the subject heading, Musical instruments.

The labels on the grid of icons and the content that they search are configurable by branch. You can use the grid to search the entire catalog, or, using the configuration files, you can apply a filter so that search queries entered here retrieve records associated with specific criteria, such as child-friendly copy locations or MARC audience codes.

Kids_OPAC4

You can add multiple layers of icons and searches to your grid:

Kids_OPAC5

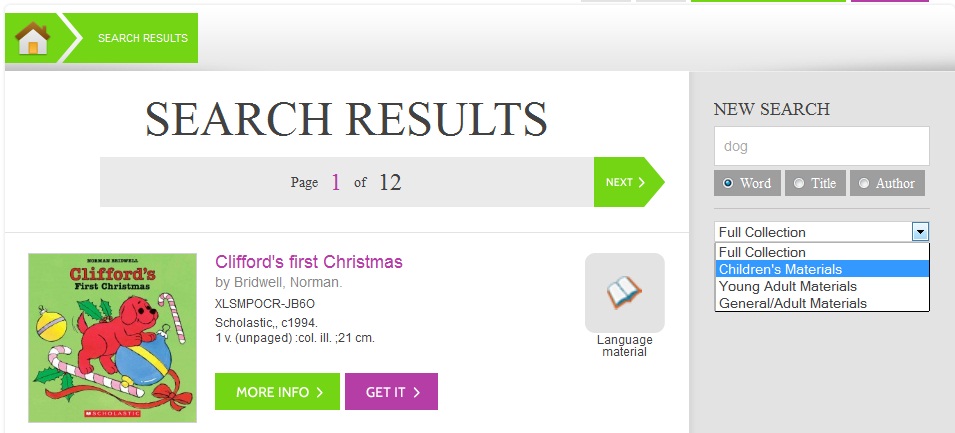
Search using the Search Bar and the Collection Drop Down Menu

On the search results page, a search bar and drop down menu appear on the right side of the screen. You can enter a search term and into the search bar and select a collection from the drop down menu to search these configured collections. Configured collections might provide more targeted searching for your audience than a general catalog search. For example, you could create collections by shelving location or by MARC audience code.

Kids_OPAC17

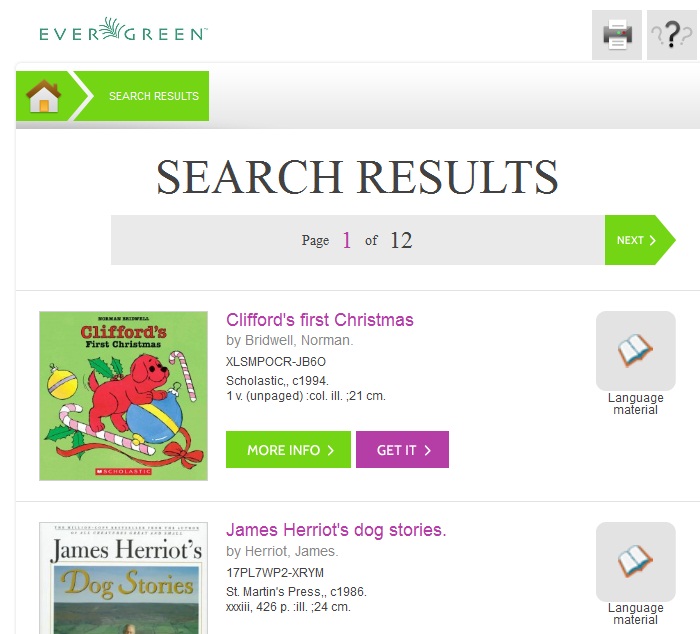
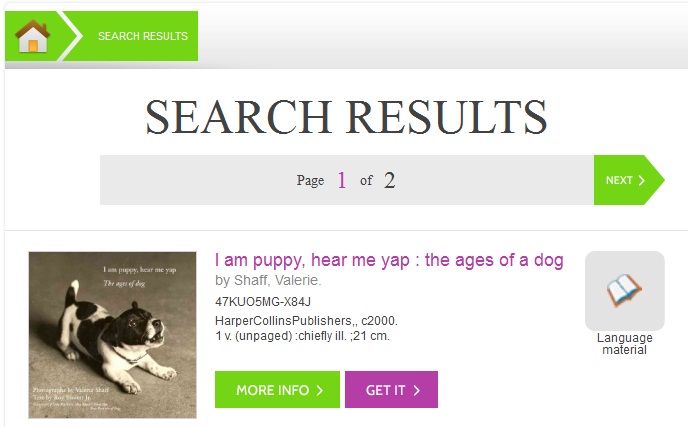
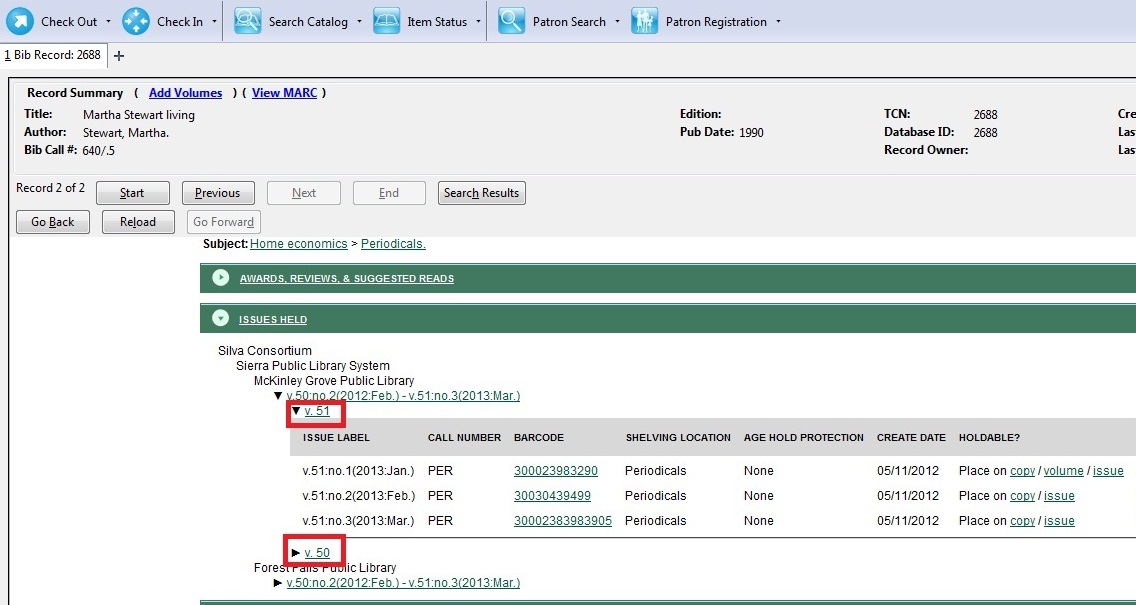
Using any search method, the search results display in the center of the screen. Brief information displays beneath each title in the initial search result. The brief information that displays, such as title, author, or publication information, is configurable.

Kids_OPAC6

For full details on a title, click More Info. The full details displays the configured fields from the title record and copy information. Click Show more copies to display up to fifty results. Use the breadcrumbs at the top to trace your search history.
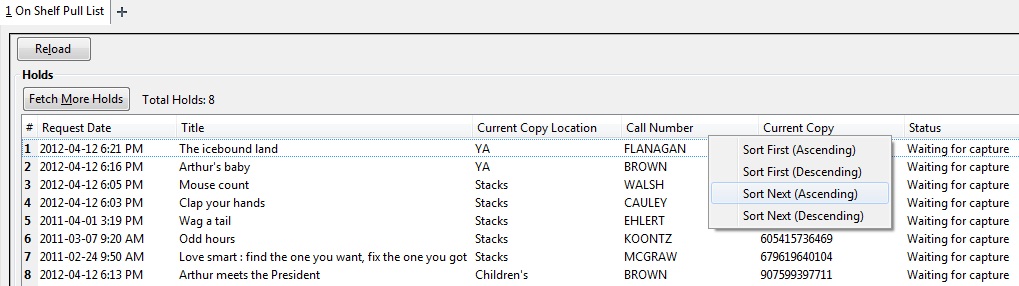
Kids_OPAC7

Place a Hold

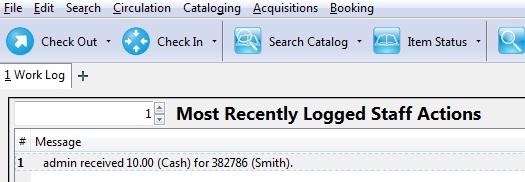
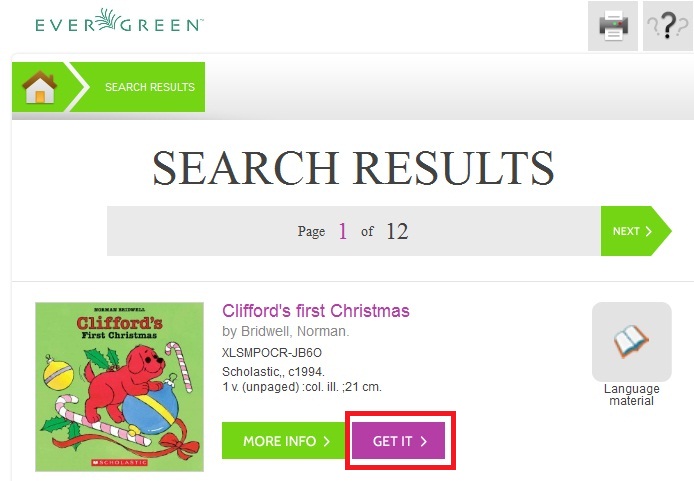
From the search results, click the Get it! link to place a hold.

Kids_OPAC11

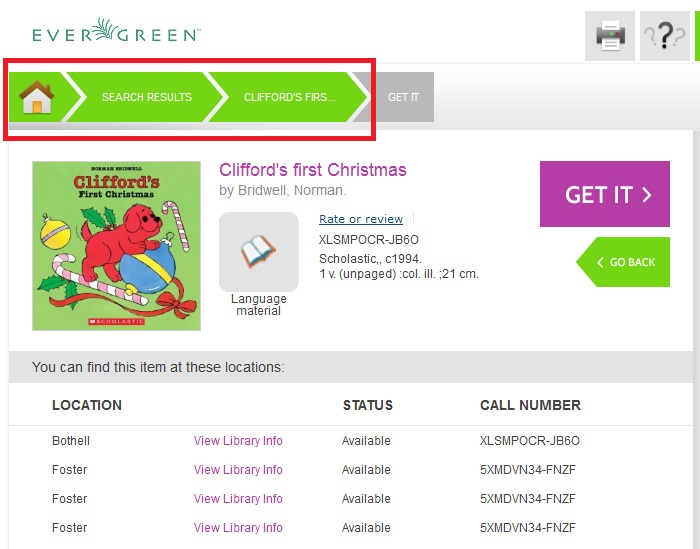
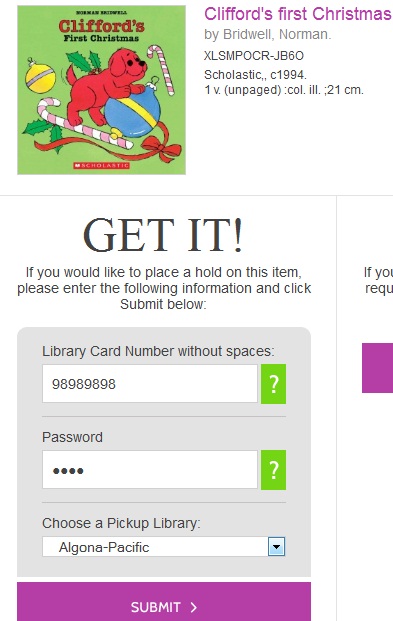
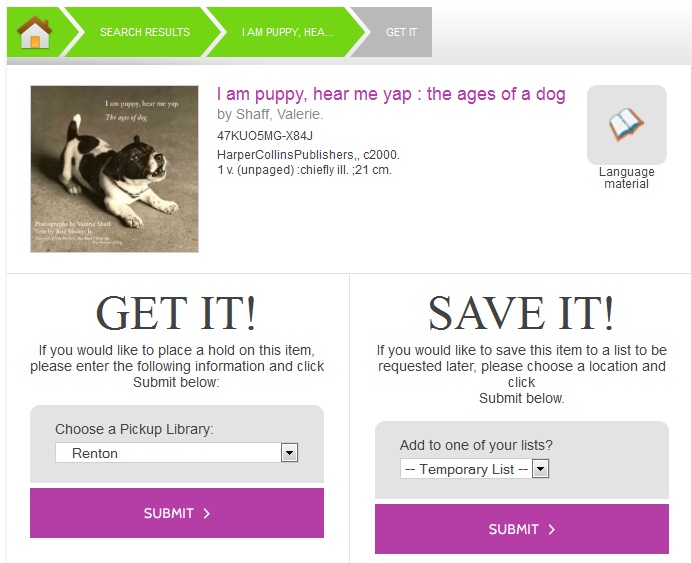
The brief information about the title appears, and, if you have not yet logged in, the Get It! panel appears with fields for username and password. Enter the username and password, and select the pick up library. Then click Submit. If you have already logged into your account, you need only to select the pick up location, and click Submit.

Kids_OPAC12

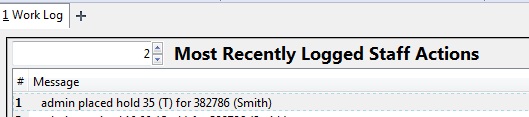
A confirmation of hold placement appears. You can return to the previous record or to your search results.

Kids_OPAC13

Save Items to a List

You can save items to a temporary list, or, if you are logged in, you can save to a list of your own creation. To save items to a list, click the Get it button on the Search Results page.

Kids_OPAC14

Select a list in the Save It! panel beneath the brief information, and click Submit.

Kids_OPAC16

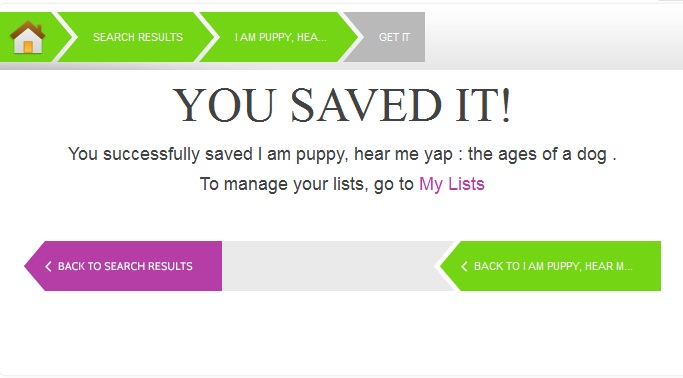
A confirmation of the saved item appears. To save the item to a list or to manage the lists, click the My Lists link to return to the list management feature in the TPAC.

Kids_OPAC15

Third Party Content

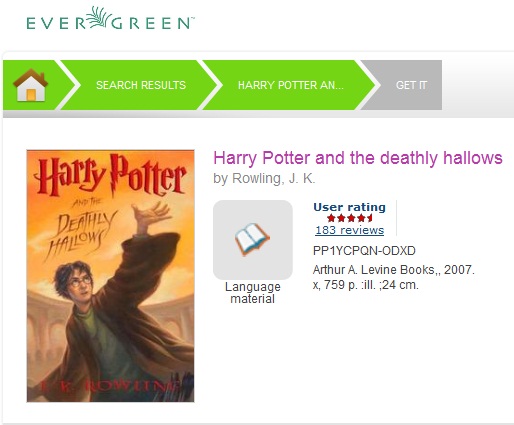
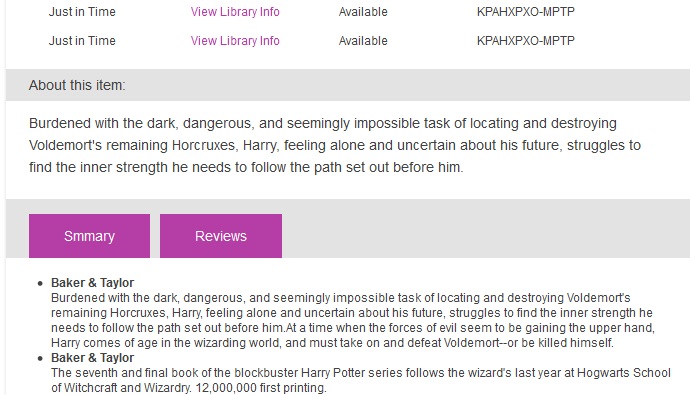
Third party content, such as reader reviews, can be viewed in the Kids OPAC. The reviews link appears adjacent to the brief information.

Kids_OPAC8

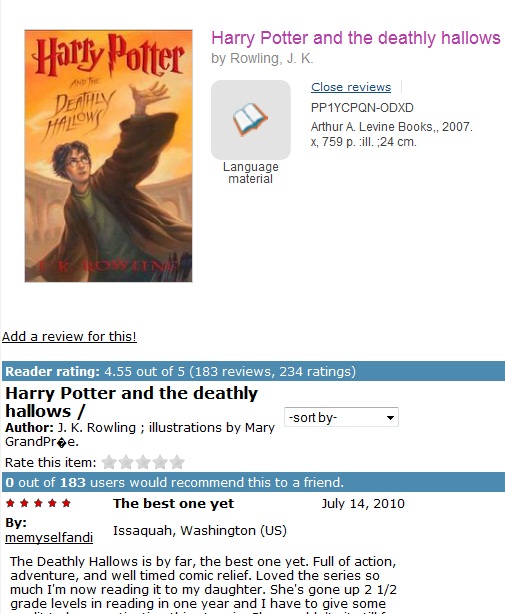
Click the Reviews link to view reader reviews from a third party source. The reader reviews open beneath the brief information.

Kids_OPAC9

Summaries and reviews from other publications appear in separate tabs beneath the copy information.
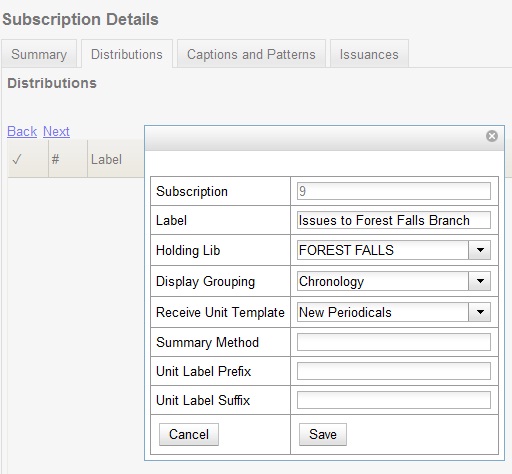
Kids_OPAC10

Configuration Files

Configuration files allow you to define labels for canned searches in the icon grid, determine how icons lead users to new pages, and define whether those icons are canned searches or links to external resources. Documentation describing how to use the configuration files is available in the Evergreen repository.

Print Friendly
Posted in Uncategorized | Leave a comment

Group Serials Issues in the OPAC 2.2

This feature is available in Evergreen version 2.2.

Abstract

In previous versions of Evergreen, issues of serials displayed in a list ordered by publication date. The list could be lengthy if the library had extensive holdings of a serial.

Using the Template Toolkit OPAC that is available in version 2.2, you can group issues of serials in the OPAC by chronology or enumeration. For example, you might group issues by date published or by volume. Users can expand these hyperlinked groups to view holdings of specific issues. The result is a clean, easy-to-naviagte interface for viewing holdings of serials with a large quantity of issues.

This document omits part of the serial creation process. For comprehensive documentation on creating serials, see the documentation provided by the Documentation Interest Group at http://docs.evergreen-ils.org/.

Note This feature is available only in the Template Toolkit OPAC.


Table of Contents

  • Administration
  • Displaying Issues in the OPAC


Administration

Enable the following organizational unit settings to use this feature:

1) Click AdminLocal AdministrationLibrary Settings Editor.

2) Search or scroll to find Serials: Default display grouping for serials distributions presented in the OPAC.

3) Click Edit.

4) Enter enum to display issues by enumeration, or enter chron to display issues in chronological order. This value will become your default setting for display issues in the OPAC.

5) Click Update Setting.

6) Search or scroll to find OPAC: Use fully compressed serials holdings.

7) Select the value, True, to view a compressed holdings statement.

8) Click Update Setting.


Displaying Issues in the OPAC

Your library system has a subscription to the periodical, Bon Appetit. The serials librarian has determined that the issues at the Forest Falls branch should display in the OPAC by month and year. The issues at the McKinley branch should display by volume and number. The serials librarian will create two distributions for the serial that will include these groupings.

1) Retrieve the bibliographic record for the serial, and click Actions for this RecordAlternate Serial Control.

2) Create a New Subscription or click on the hyperlinked ID of an existing subscription.

3) Click New Distribution.

4) Create a label to identify the distribution.

5) Select the holding library from the drop down menu that will own physical copies of the issues.

6) Select a display grouping. Select chronology from the drop down menu.

7) Select a template from the drop down menu to receive copies.

8) Click Save.

Group_Serials_Issues_in_the_OPAC2

9) Click New Distribution and repeat the process to send issues to the McKinley Branch. Choose enumeration in the Display Grouping field to display issues by volume and number.

10) Complete the creation of your subscription.

11) Retrieve the record from the catalog.

12) Scroll down to and click the Issues Held link. The issues label for each branch appears.

13) Click the hyperlinked issues label.

The issues owned by the Forest Falls branch are grouped by chronology:

Group_Serials_Issues_in_the_OPAC5

The issues owned by the McKinley branch are grouped by enumeration:

Group_Serials_Issues_in_the_OPAC7

Author: Sally Fortin, Equinox Software

Print Friendly
Posted in Uncategorized | Leave a comment

Group Serials Issues in the OPAC 2.2

This feature is available in Evergreen version 2.2.

Abstract

In previous versions of Evergreen, issues of serials displayed in the OPAC as successive copies by date. Using the Template Toolkit OPAC that is available in version 2.2, you can group issues of serials in the OPAC by chronology or enumeration. These hyperlinked groups appear in a list to users who can then expand the group to view holdings of specific issues. For example, you might group issues by date published or by volume. The result is a clean, easy-to-naviagte interface for viewing holdings of serials with a large quantity of issues.

This document omits part of the serial creation process. For comprehensive documentation of creating serials, see the documentation provided by the Documentation Interest Group.

Table of Contents

  • Administration
  • Displaying Issues in the OPAC

Administration

Enable the following organizational unit settings to use this feature:

1) Click AdminLocal AdministrationLibrary Settings Editor.

2) Search or scroll to find Serials: Default display grouping for serials distributions presented in the OPAC.

3) Click Edit.

4) Enter enum to display issues by enumeration, or enter chron to display issues in chronological order. This value will become your default setting for display issues in the OPAC.

5) Click Update Setting.

6) Search or scroll to find OPAC: Use fully compressed serials holdings.

7) Select the value, True, to view a compressed holdings statement.

8) Click Update Setting.

Note This feature is only available in the Template Toolkit OPAC.


Displaying Issues in the OPAC

Your library system has a subscription to the periodical, Bon Appetit. The serials librarian has determined that the issues at the Forest Falls branch should display in the OPAC by month and year. The issues at the McKinley branch should display by volume and number. The serials librarian will create two distributions for the serial that will include these groupings.

1) Retrieve the bibliographic record for the serial, and click Actions for this RecordAlternate Serial Control.

2) Create a New Subscription or click on the hyperlinked ID of an existing subscription.

3) Click New Distribution.

4) Create a label to identify the distribution.

5) Select the holding library from the drop down menu that will own physical copies of the issues.

6) Select a display grouping. MORE? Select chronology from the drop down menu.

7) Select a template from the drop down menu to receive copies.

8) Click Save.

Group_Serials_Issues_in_the_OPAC2

9) Click New Distribution and repeat the process to send issues to the McKinley Branch. Choose enumeration in the Display Grouping field to display issues by volume and number.

10) Complete the creation of your subscription.

11) Retrieve the record from the catalog.

12) Scroll down to and click the Issues Held link. The issues label for each branch appears.

13) Click the hyperlinked issues label.


The issues owned by the Forest Falls branch are grouped by chronology:

Group_Serials_Issues_in_the_OPAC5


The issues owned by the McKinley branch are grouped by enumeration:

Group_Serials_Issues_in_the_OPAC7


Author: Sally Fortin, Equinox Software

Print Friendly
Posted in Uncategorized | Leave a comment

Restrict Z39.50 Sources by Permission Group 2.2

This functionality will be available in Evergreen version 2.2.

Abstract

In Evergreen versions preceding 2.2, all users with cataloging privileges could view all of the Z39.50 servers that were available for use in the staff client. In Evergreen version 2.2, you can use a permission to restrict users’ access to Z39.50 servers. You can apply a permission to the Z39.50 servers to restrict access to that server, and then assign that permission to users or groups so that they can access the restricted servers.

Table of Contents

  • Administrative Settings
  • Restrict Z39.50 Sources by Permission Group

Administrative Settings

You can add a permission to limit use of Z39.50 servers, or you can use an existing permission.

Note You must be authorized to add permission types at the database level to add a new permission.


Add a new permission:

1) Create a permission at the database level.

2) Click Admin → Server Administration → Permissions to add a permission to the staff client.

3) In the New Permission field, enter the text that describes the new permission.

Restrict_Z39.50_Sources_by_Permission_Group2

4) Click Add.

5) The new permission appears in the list of permissions.


Restrict Z39.50 Sources by Permission Group

1) Click Admin → Server Administration → Z39.50 Servers

2) Click New Z39.50 Server, or double click on an existing Z39.50 server to restrict its use.

3) Select the permission that you added to restrict Z39.50 use from the drop down menu.

Restrict_Z39.50_Sources_by_Permission_Group3

4) Click Save.

5) Add the permission that you created to a user or user group so that they can access the restricted server.

Restrict_Z39.50_Sources_by_Permission_Group1

6) Users that log in to the staff client and have that permission will be able to see the restricted Z39.50 server.


Note As an alternative to creating a new permission to restrict use, you can use a preexisting permission. For example, your library uses a permission group called SuperCat, and only members in this group should have access to a restricted Z39.50 source. Identify a permission that is unique to the SuperCat group (e.g. CREATE_MARC) and apply that permission to the restricted Z39.50 server. Because these users are in the only group with the permission, they will be the only group w/ access to the restricted server.

Copyright: 2011 Equinox Software. Available for redistribution with proper attribution under CC-BY-SA license.

Author: Sally Fortin, Equinox Software

Print Friendly
Posted in Uncategorized | Leave a comment

Fine Accrual on Closed Dates 2.2

This feature is available in Evergreen version 2.2.

By default, fines accrue only on dates that the library is open. This feature enables you to charge patrons fines on dates the library is closed. Fines accrue during scheduled closings as well as during normal weekly closed dates.

To enable this feature:

1) Click AdminLocal AdministrationLibrary SettingsCharge fines on overdue circulations when closed

2) Click Edit.

3) Set the value to True.

4) Click Update Setting.

Author: Sally Fortin, Equinox Software

Print Friendly
Posted in Uncategorized | Leave a comment

Custom Org Unit Trees 2.2

This feature is available in Evergreen version 2.2.

Abstract

Evergreen enables you to create an organizational tree that describes the systems, branches, or other units that comprise your organization. By default, the org unit tree that appears to patrons in the OPAC is identical to the one that appears to users of the staff client. Using this feature, you can condense or re-order the organizational tree into a simpler structure for patrons using the OPAC while maintaining the complex organizational tree that is available to users of the staff client.

As a further enhancement, you can hide a parental org unit yet still make its child org units visible in the OPAC. In previous versions of Evergreen, child org units inherited the visibility setting of their parents.

Table of Contents

  • Create a Custom Org Unit Tree
  • Create a non-OPAC Visible Parental Org Unit
  • Permissions

Create a Custom Org Unit Tree

By default, all branches display beneath the parental org unit, system:

Custom_Org_Unit_Tree1

You want patrons to view an org unit tree that displays a system preceeding the main branch, but you want all of the remaining branches to display beneath the main branch. To the patron, the library system will appear to have one main branch and multiple sub-libraries of the main branch.

In this example, the org unit tree contains the Lexington System which contains Lexington-Main (Branch), Oxford (Branch), and Richland (Branch). You want to move the Oxford and Richland branches beneath Lexington-Main.

1) Select the branch(es) in the Custom Unit Tree that you want to move, and drag it to the desired location in the tree. You can move as many org units as desired, but you cannot remove the root, or the top level org unit, of the org tree.

Custom_Org_Unit_Tree2

2) Click Apply Changes.

3) Click Activate Tree to make it available to your patrons.

4) Reload the server.


Note The Full Org Unit Tree on the left enables you to replace org units that were previously removed from the custom tree. For example, if you delete LEX-MAIN from your custom tree and later decide you want to add it back, then you would drag that branch from the reference tree on the left back into your custom tree.


Create a non-OPAC Visible Parental Org Unit

By default, if a parental org unit is non-OPAC visible, then its children are also non-OPAC visible. With this feature, you can make a parental org unit non-OPAC visible while the child org units remain visible. A new administrative setting enables you to specify that org units do not inherit visibility, so visibility can be set for each individual org unit.

1) Click AdministrationServer AdministrationGlobal Flags

2) Scroll to Org Units Do Not Inherit Visibility.

3) Double click anywhere in the field.

4) Check the box adjacent to Enabled.

5) Click Save.

6) Reload the server.

Permissions

ADMIN_ORG_UNIT_CUSTOM_TREE – Allows a user to add custom org unit trees. You must have this permission at the consortium level.

Author: Sally Fortin, Equinox Software

Print Friendly
Posted in Uncategorized | Leave a comment

Sorting Columns 2.2

This feature is available in Evergreen version 2.2.

Abstract

This feature enables you to sort display columns so that you can find easily the information that you need on a screen that contains multiple columns. You can sort display columns on any screen that is built on a grid, such as the Check In screen or the On Shelf Pull List.

You can also sort the columns on the following Administration screens: Circulation Policies, Hold Policies, Circulation Limit Sets, Barcode Completion, Acquisitions User Request List, and Vandelay Import Errors.

You can sort items in an ascending or descending order, and you can prioritize the order in which columns will sort. The following use cases illustrate how to sort items within the Circulation and Administration interfaces.

Table of Contents

  • Sorting items on the On Shelf Pull List
  • Sorting Circulation Policies

Sorting the On Shelf Pull List

You want to capture items that are on the shelf to fill current holds. To simplify this process, you will sort the items on the On Shelf Pull List by Copy Location and Call Number.

1) Click CirculationPull List for Hold Requests.

2) The first column that you want to sort is the column, Current Copy Location. Right click the column header, Current Copy Location.

3) Click Sort First (Descending).

Sorting_Columns3

4) The next column that you want to sort is the column, Call Number. Right click the column header, Call Number.

5) Click Sort Next (Ascending).

Sorting_Columns4

6) The pull list has now been sorted by copy location and call number.

Sorting_Columns5
Note If you wanted to sort more columns, you could continue the process by clicking Sort Next for any subsequent columns.


Sorting Circulation Policies

You want to sort the display of circulation policies in your staff client.

1) Click AdministrationLocal AdministrationCirculation Policies.

2) Right click on any column header.

3) A pop-up box appears.

Sorting_Columns2

4) Check the Display box if you want to display a column in the staff client.

5) Check the Auto Width box if you want the width of the columns to adjust to fit the staff client.

6) Select a sort priority.

A sort priority of “0″ indicates that no sorting has been applied. Columns will display in their default order.

A sort priority of “1″ indicates that ascending sorting should be applied to this column first. Subsequent sorts will be applied as you continue to enter increasing numbers.

A sort priority of “-1″ indicates that descending sorting should be applied to this column.

7) Click Save. The circulation policies will now sort according to your selections each time that you log into the staff client.

Author: Sally Fortin, Equinox Software

Print Friendly
Posted in Uncategorized | Leave a comment