2.4 Bibliographic Search Enhancements

2.4 Bibliographic Search Enhancements

These features are available in Evergreen version 2.4.

Enhancements to the bibliographic search function enable you to search for records that were created, edited, or deleted within a date range. You can use the catalog interface or the record feed to search for records with specific date ranges.

Note that all dates should be formatted as YYYY-MM-DD and should be included in parentheses.

Use the Catalog to Retrieve Records with Specified Date Ranges:

Search by Create Date or Range

To find records that were created on or after a specific date, enter the term, create_date, and the date in the catalog search field. For example, to find records that were created on or after April 1, 2013, enter the following into the catalog search field:

create_date(2013-04-01)

To find records that were created within a specific date range, enter the term, create_date, followed by comma-separated dates in parentheses. For example, to find records that were created between April 1, 2013 and April 8, 2013, enter the following into the catalog search field:

create_date(2013-04-01,2013-04-08)

Search by Edit Date or Range

To find records that were edited on or before a specific date, enter the term, edit-date, and the date in the catalog search field. The date should be preceded by a comma. For example, to find records that were edited on or before April 1, 2013, enter the following into the catalog search field:

edit_date(,2013-04-01)

To find records that were edited on or after a sepcific date, enter the term, edit_date, and the date in the catalog search field. For example, to find records that were edited on or after April 1, 2013, enter the following into the catalog search field:

edit_date(2013-04-01)

To find records that were edited within a specific range, enter the term, edit_date, followed by comma-separated dates in parentheses. For example, to find records that were edited between April 1, 2013 and April 8, 2013, enter the following into the catalog search field:

edit_date(2013-04-01,2013-04-08)

Search by Deleted Status

To search for deleted records, enter in your catalog search field the term, edit_date, the date that you want to search, and the term, #deleted. For example, to find records that were deleted on or after April 1, 2013, enter the following into the catalog search field:

edit_date(2013-04-01)#deleted

To find records that were deleted within a specific range, enter the term, edit_date, followed by comma-separated dates in parentheses. For example, to find records that were deleted between April 1, 2013 and April 8, 2013, enter the following into the catalog search field:

edit_date(2013-04-01,2013-04-08)#deleted

Use a Feed to Retrieve Records with Specified Date Ranges:

You can use a feed to retrieve records that were created, edited, or deleted within specific date ranges by adding the dates to the catalog’s URL. You can do this manually, or you can write a script that would automatically retrieve this information.

To manually retrieve records that were created, edited, or deleted within a specific date, enter the terms and dates as specified above within the search terms in the URL. For example, to retrieve records created on or after April 1, 2013, enter the following in your URL:

http://alexanderstreet-test.esilibrary.com/opac/extras/opensearch/1.1/-/html-full?searchTerms=create_date(2013-04-01)&searchClass=keyword

Note

To retrieve deleted records, replace the # with %23 in your URL.

Author: Sally Fortin, Athenaeum Educational Services

Print Friendly
Posted in Documentation | Leave a comment

2.4 Binary MARC21 Feeds

2.4 Binary MARC21 Feeds

This feature is available in Evergreen version 2.4.

Evergreen’s OpenSearch service can return search results in many formats, including HTML, MARCXML, and MODS. In version 2.4, it can also return results in binary MARC21 format.

When making an HTTP request to an Evergreen system using the OpenSearch API, you must include the term “marc21″ in the appropriate location within the URL to retrieve a feed of MARC21 records in a binary format. The following example demonstrates the appropriate form of the URL:

http://alexanderstreet-test.esilibrary.com/opac/extras/opensearch/1.1/-/marc21?searchTerms=create_date%282013-04-01%29&searchClass=keyword

You can add this term manually to the URL produced by a catalog search, or you can create a script that would retrieve this information automatically.

Author: Sally Fortin, Athenaeum Educational Services

Print Friendly
Posted in Documentation | Leave a comment

2.4 Org Unit Hiding in TPAC

This feature is available in Evergreen version 2.4.

Summary

This feature enables you to hide specific org units from patron view in the OPAC. Org units that have not inherited this setting will display in patron-facing dropdowns.

To enable Org Unit Hiding in TPAC:

1) Click AdminLocal AdministrationLibrary Settings EditorOrg Unit Hiding Depth. Note: This setting is inherited.

2) Enter a value of 0, 1, or 2 as appropriate. Values are described in the setting description. To view the setting description, click the Edit link in the first column on the Library Settings interface.

3) Click Update Setting.

Author: Sally Fortin, Athenaeum Educational Services
Print Friendly
Posted in Documentation | Leave a comment

2.4 MARC Import Remove Fields

This feature is available in Evergreen version 2.4.

Abstract

MARC Import Remove Fields allows staff to configure MARC tags to be automatically removed from bibliographic records when they are imported into Evergreen. This feature allows specific MARC tags to be removed from records that are imported through three different interfaces:

  • Cataloging → Import Record from Z39.50
  • Cataloging → MARC Batch Import/Export
  • Acquisitions → Load MARC Order Records

Table of Contents

  • Create a MARC Import Remove Fields profile
  • Import Options
  • Permissions to use this Feature

Create a MARC Import Remove Fields profile

To create a MARC Import Remove Fields profile, go to Admin → Server Administration → MARC Import Remove Fields.

  1. Click New Field Group.
  2. Assign the Field Group a Label. This label will appear in the import interfaces.
  3. Assign an Org Unit Owner.
  4. Check the box next to Always Apply if you want Evergreen to apply this Remove Fields profile to all MARC records that are imported through the three affected interfaces. If you do not select Always Apply, staff will have the option to choose which Remove Fields profile to use when importing records.
  5. Click Save.
  6. The profile that you created will now appear in the list of MARC Import Remove Fields.
  7. Click on the hyperlinked ID number. This will bring you into the Remove Fields profile to configure the MARC tags to be removed.
  8. Click New Field.
  9. In the Field, enter the MARC tag to be removed.
  10. Click Save.
  11. Add New Fields until you have configured all the tags needed for this profile.
  12. Click Return to Groups to go back to the list of Remove Field profiles.
MARC Remove Fields Profile

Import Options

The Label for each of the MARC Import Remove Fields profiles will appear on the three affected import screens. To select a profile, check the box next to the desired Label before importing the records.

Cataloging → Import Record from Z39.50

Import Record from Z39.50


Cataloging → MARC Batch Import/Export

MARC Batch Import/Export


Acquisitions → Load MARC Order Records

Load MARC Order Records


Permissions to use this Feature

The following permissions are required to use this feature:

  • CREATE_IMPORT_TRASH_FIELD
  • UPDATE_IMPORT_TRASH_FIELD
  • DELETE_IMPORT_TRASH_FIELD  

Author: Angela Kilsdonk, Equinox Software

Print Friendly
Posted in Documentation | Leave a comment

2.4 Best-Hold Selection Sort Order

This feature is available in Evergreen version 2.4.

Abstract

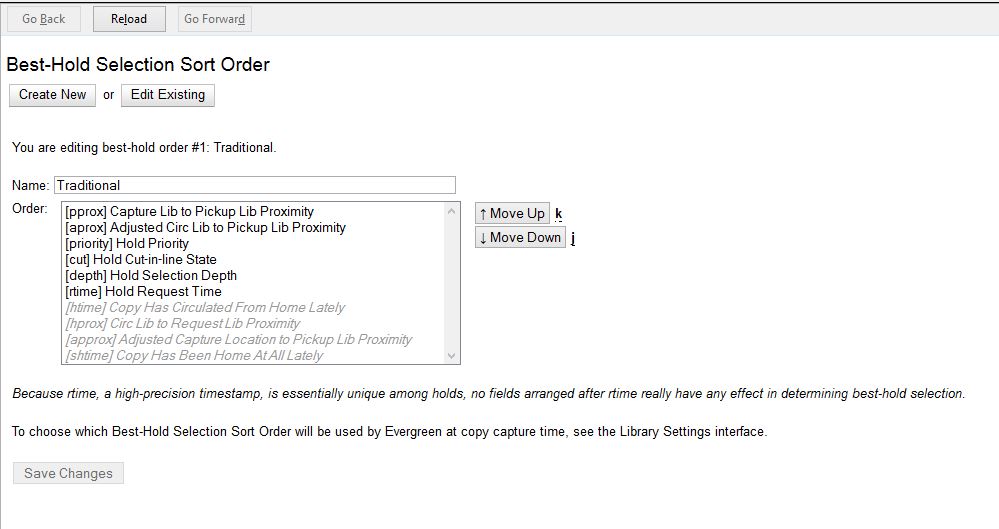
Best-Hold Selection Sort Order allows libraries to configure customized rules for Evergreen to use to select the best hold to fill at opportunistic capture. When a copy is captured for a hold upon check-in, Evergreen evaluates the holds in the system that the item could fill. Evergreen uses a set of rules, or a Best-Hold Selection Sort Order, to determine the best hold to fill with the item. In previous version of Evergreen, there were two sets of rules for Evergreen to use to determine the best hold to fulfill: Traditional and FIFO (First In, First Out). Traditional uses Org Unit Proximity to identify the nearest hold to fill. FIFO follows a strict order of first-in, first-out rules. This feature allows new, custom Best-Hold Selection Sort Orders to be created. Existing Best-Hold Selection Sort Orders can also be modified.

Table of Contents

  • Preconfigured Best-Hold Orders
  • Create a new Best-Hold Selection Sort Order
  • Edit an existing Best-Hold Selection Sort Order
  • Set your library’s Best-Hold Selection Sort Order
  • Permissions to use this Feature

Preconfigured Best-Hold Orders

Evergreen comes with six preconfigured Best-Hold Selection Sort Orders to choose from:

  • Traditional
  • Traditional with Holds-go-home
  • Traditional with Holds-always-go-home
  • FIFO
  • FIFO with Holds-go-home
  • FIFO with Holds-always-go-home

The Holds-go-home and Holds-always-go-home options allow libraries to determine how long they want to allow items to transit outside of the item’s home library, before it must return to its home library to fulfill any holds that are to be picked up there. Libraries can set this time limit in the library setting Holds: Max foreign-circulation time. The Library Settings Editor can be found under Admin → Local Administration → Library Settings Editor.

Create a New Best-Hold Selection Sort Order

To create a new Best-Hold Selection Sort Order, go to Admin → Server Administration → Best-Hold Selection Sort Order.

  1. Click Create New.
  2. Assign your Best-Hold Selection Sort Order a Name.
  3. Next, use the Move Up and Move Down buttons to arrange the fields in the order that you would like Evergreen to check when looking for the best hold to fill with a copy at opportunistic capture.
  4. Click Save Changes to create your custom Best-Hold Selection Sort Order.
Best-Hold Selection Sort Order

Edit an Existing Best-Hold Selection Sort Order

To edit an existing Best-Hold Selection Sort Order, go to Admin → Server Administration → Best-Hold Selection Sort Order.

  1. Click Edit Existing.
  2. Choose the Best-Hold Selection Sort Order that you would like to edit from the drop down menu.
  3. Next, use the Move Up and Move Down buttons to arrange the fields in the new order that you would like Evergreen to check when looking for the best hold to fill with a copy at opportunistic capture.
  4. Click Save Changes to save your edits.

Choosing the Best-Hold Selection Sort Order

The Best-Hold Selection Sort Order can be set for an Org Unit in the Library Settings Editor.

To select the Best-Hold Selection Sort Order that your Org Unit will use:

  1. Go to Admin → Local Administration → Library Settings Editor.
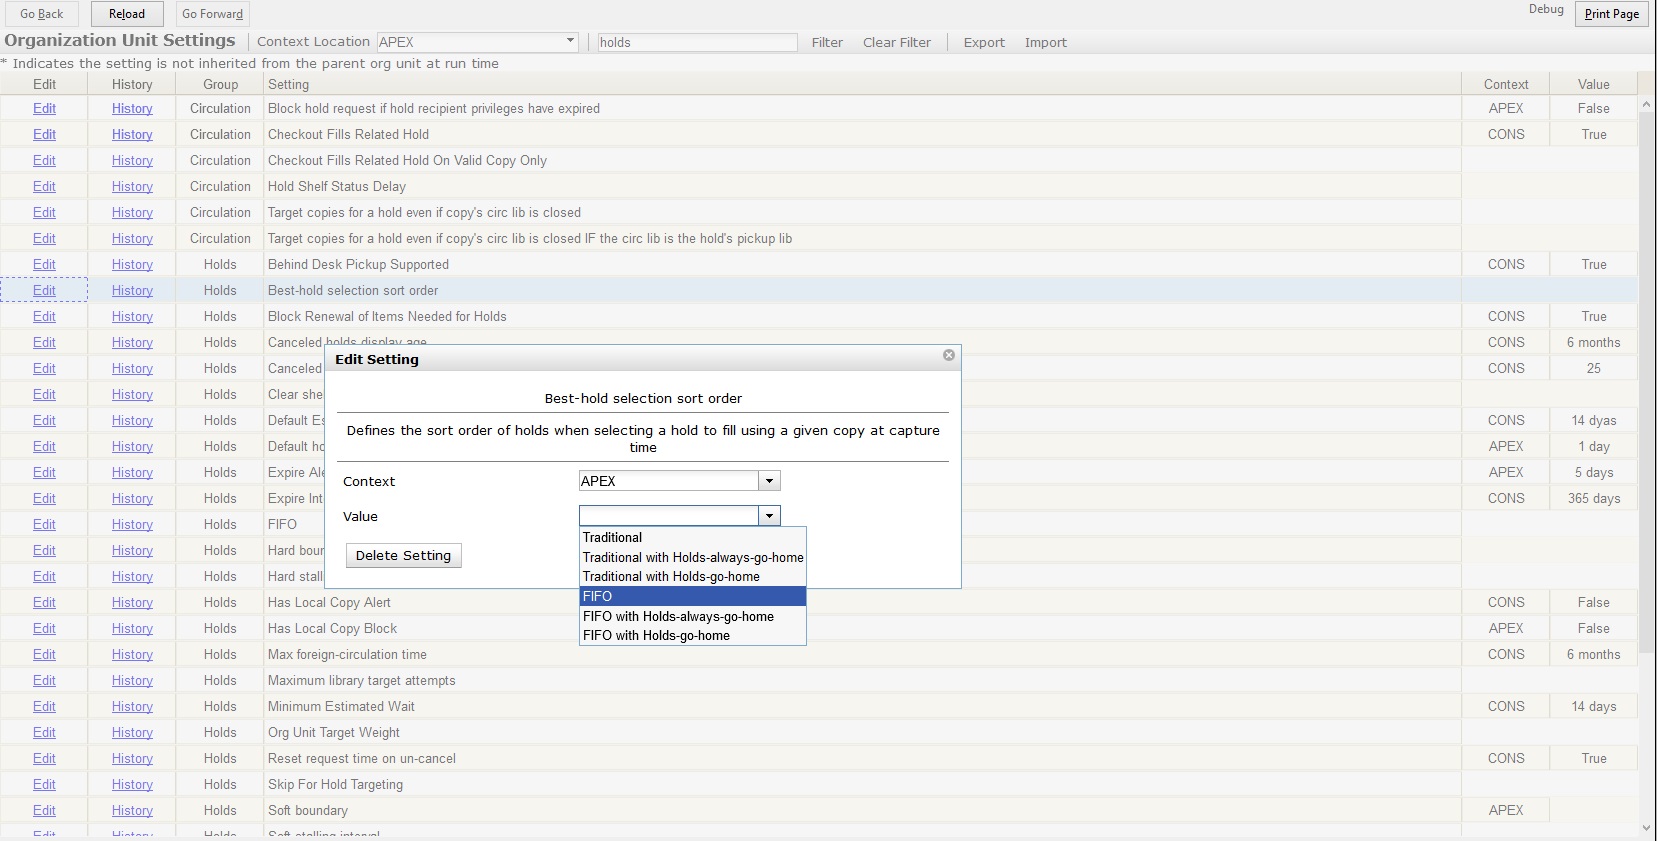
  2. Locate the setting Holds: Best-hold selection sort order, and click Edit.
  3. Choose the Context org unit for this setting.
  4. Select the Best-hold selection sort order, or Value, from the drop down menu.
  5. Click Update Setting.
Library Settings Editor

Permissions to use this Feature

To administer the custom Best-Hold Selection Sort Order interface, you need the following permission:

  • ADMIN_HOLD_CAPTURE_SORT

Author: Angela Kilsdonk, Equinox Software

Print Friendly
Posted in Documentation | Leave a comment

2.4 Org Unit Proximity Adustments


2.4 Org Unit Proximity Adustments

This feature is available in Evergreen version 2.4.

Org Unit Proximity Adjustments

Org Unit Proximity Adjustments allow libraries to indicate lending preferences for holds between libraries in an Evergreen consortium. When a hold is placed in Evergreen, the hold targeter looks for copies that can fill the hold. One factor that the hold targeter uses to choose the best copy to fill the hold is the distance, or proximity, between the capturing library and the pickup library for the request. The proximity is based on the number of steps through the org tree that it takes to get from one org unit to another.

Org Unit Proximity

Org Unit Proximity between BR1 and BR4 = 4

Org Unit Proximity Adjustments allow libraries to customize the distances between org units, which provides more control over which libraries are looked at when targeting copies to fill a hold. Evergreen can also be configured to take Org Unit Proximity Adjustments into account during opportunistic capture through the creation of a custom Best-Hold Selection Sort Order. See documentation here for more information on Best-Hold Selection Sort Order.

An Org Unit Proximity Adjustment can be created to tell Evergreen which libraries to look at first for copies to fill a hold or which library to look at last. This may be useful for accounting for true transit costs or physical distances between libraries. It can also be used to identify libraries that have special lending agreements or preferences. Org Unit Proximity Adjustments can be created for all holds between two org units, or they can be created for holds on specific Copy Locations and Circulation Modifiers.

Absolute and Relative Adjustments

Two types of proximity adjustments can be created in Evergreen: Absolute adjustments and Relative adjustments.

Absolute proximity adjustments allow you to replace the default proximity distance between two org units. An absolute adjustment could be made to tell the hold targeter to look at a specific library or library system first to find an item to fill a hold, before looking elsewhere in the consortium.

Relative proximity adjustments allows the proximity between org units to be treated as closer or farther from one another than the default distance. A relative proximity adjustment could be used to identify a library that has limited hours or slow transit times to tell the hold targeter to look at that library last for copies to fill a hold.

Create an Org Unit Proximity Adjustment

To create an Org Unit Proximity Adjustment between two libraries:

  1. In the Admin menu choose Server Administration → Org Unit Proximity Adjustments.
  2. Click New OU Proximity Adjustment.
  3. Choose an Item Circ Lib from the drop down menu.
  4. Choose a Hold Request Lib from the drop down menu.
  5. If this proximity adjustment applies to a specific copy location, select the appropriate Copy Location from the drop down menu.
  6. If this proximity adjustment applies to a specific material type, select the appropriate Circ Modifier from the drop down menu.
  7. If this is an Absolute proximity adjustment, check the box next to Absolute adjustment? If you leave the box blank, a relative proximity adjustment will be applied.
  8. Enter the Proximity Adjustment between the Item Circulating Library and the Request Library.
  9. Click Save.
Org Unit Proximity Adjustment

This will create a one-way proximity adjustment between Org Units. In this example this adjustment will apply to items requested at by a patron BR4 and filled at BR1. To create the reciprocal proximity adjustment, for items requested at BR1 and filled at BR4, create a second proximity adjustment between the two Org Units.

Permissions to use this Feature

To create Org Unit Proximity Adjustments, you will need the following permission:

  • ADMIN_PROXIMITY_ADJUSTMENT

Author: Angela Kilsdonk, Equinox Software

Print Friendly
Posted in Documentation | Leave a comment

2.4 Local Call Number in My Lists

This feature is available in Evergreen version 2.4.

In Evergreen version 2.4, when a title is added to a list in the TPAC, a local call number will be displayed in the list to assist patrons in locating the physical item. Evergreen will look at the following locations to identify the most relevant call number to display in the list:

  1. Physical location – the physical library location where the search takes place
  2. Preferred library – the Preferred Search Location, which is set in patron OPAC account Search and History Preferences, or the patron’s Home Library
  3. Search library – the search library or org unit that is selected in the OPAC search interface

The call number that is displayed will be the most relevant call number to the searcher. If the patron is searching at the library, Evergreen will display a call number from that library location. If the patron is not searching at a library, but is logged in to their OPAC account, Evergreen will display a call number from their Home Library or Preferred Search Location. If the patron is not searching at the library and is not signed in to their OPAC account, then Evergreen will display a call number from the org unit, or library, that they choose to search in the OPAC search interface.

The local call number and associated library location will appear in the list:

Local Call Number in List

Author: Angela Kilsdonk, Equinox Software

Print Friendly
Posted in Documentation | Leave a comment

2.5 Evergreen Integration with PV Supa GoodStuff RFID Reader

This feature is available in Evergreen version 2.5.

Summary

This feature enables the Evergreen staff client to “talk” to the PV Supa Goodstuff RFID reader so that libraries can utilize PV Supa Goodstuff’s RFID technology when checking items in and out.

Administration

To use PV Supa Goodstuff, you must add code to the Admin module that Evergreen can use to identify the reader.

1) Click AdminWorkstation AdminServer Add-ons.

2) Enter the code, pv_supa_goodstuff, to identify PV Supa Goodstuff in the Active Server Add-Ons field.

3) Click Update Active Add-Ons.

4) Look at the next field, Add-on Preferences. Enter information in the GoodStuff tab.

5) Check the Enabled check box to enable this add-on.

6) Enter the IP/Hostname of the hardware.

7) Enter the port.

8) Click Update.

Using RFID at the Circulation Desk

RFID functionality is available in the Circulation module via the check-out interface, the check-out function in the patron account, and the check-in interface.

From the Check-Out interface (F1):

1) Check the RFID checkbox if your library cards have embedded RFID chips that Evergreen can use to retrieve the patron barcode. RFID check boxes appear only if appropriate code words have been added in the Server Add-Ons.

2) Place the patron’s library card and/or item(s) on the PV Supa Goodstuff Reader. Evergreen will take you to the patron’s account. If item(s) with RFID chips have also been placed on the reader, and the corresponding checkbox is checked, then Evergreen will scan the item(s) into the patron’s account.

Note

RFID check boxes are sticky, so if you have checked an RFID box once, then it will continue to be checked when you re-open the interface.

Note

If you do not use RFID chips to retrieve patrons’ accounts, then leave the RFID box unchecked. You can scan a patron barcode with a barcode scanner, and Evergreen will retrieve the patron data without using the RFID feature. From the patron’s account, Evergreen can check out items using the RFID reader. See the next section for details.

3) Click Done to complete the transaction, or close the window.

From the Check-Out tab in a patron’s record:

1) Open a patron’s record, and stack the item(s) to be checked out on the RFID reader. To retrieve item data using the RFID chips embedded in the item barcodes, click the RFID check box at the bottom of the patron account. When this box is checked, Evergreen will read the item(s) that are stacked on the RFID reader, check out the item(s), and disable the security bits.

2) Click Done to complete the transaction, or close the window.

Note

Evergreen pop-up messages, such as an Alert Message or Item Already Circulating may appear during transactions. Two new dialogs specific to PV Supa Goodstuff may also appear. One dialog, Incomplete Sets, allows you to continue checking out an incomplete set, such as a CD collection, or you can ask the hardware to rescan the RFID tags to look again for a full set. The second dialog allows you to manually attempt to set or unset the security bit on an item if the automatic attempt failed.

From the Check In interface:

1) Click the RFID check box.

2) Place the items on the PV Supa Goodstuff Reader.

3) Evergreen will tell the reader to check in the item(s) and enable the security bits. The item(s) appear in a list on the screen.

Author: Sally Fortin, Athenaeum Educational Services
Print Friendly
Posted in Documentation | Leave a comment

2.4 Link Checker

This feature is available in Evergreen version 2.4.

The Link Checker enables you to verify the validity of URLs stored in MARC records. The ability to verify URLs would benefit locations with large electronic resource collections.

Table of Contents

  • Search for URLs
  • View your Results
  • Manage Your Sessions
    • Edit Columns
    • Clone Sessions
    • View Verification Attempts

Search for URLs

Search for MARC records that contain URLs that you want to verify.

1) Click CatalogingLink Checker.

2) Click New Link Checker Session.

3) Create a session name. Note that each session must have a unique name.

4) Select a search scope from the drop down menu. Records that would be retrieved by searching Example Branch 1 (BR1) in an OPAC search would also be retrieved here. For example, a record that describes an electronic resource with a URL in the 856 $u and an org unit code, such as BR1, in the 856 $9, would be retrieved by a search of relevant keywords. Also, records that contain a URL without the $9 subfield, but also have physical copies at BR1, would be retrieved. Note that you can skip this step if you enter the org unit code of the location that you want to search in the Search field.

5) Enter search terms to retrieve records with URLs that you want to verify. You can also add a location filter, such as BR1.

6) You may further limit your search by selecting a saved search. Saved searches are filters made up of specific criteria, such as shelving location or audience. Adding a saved search to your keyword search will narrow your search for records with URLs. This step is optional.

7) Enter tags and subfields that contain URLs in the appropriate boxes. Click Add after you enter the data in the fields. You can add multiple tags and subfields by repeating this process. Evergreen will search for records that match your search terms, and then, from the set that it retrieves, it will extract any URLs from all of the tag/subfield locations you have specified for the session.

8) To view and manually verify the URLs that Evergreen retrieves, leave the Process Immediately button unchecked. If you want Evergreen to automatically verify the URLs that it retrieves, then check the box to Process Immediately.

9) Click Begin to process your search.

Link_Checker1

View Your Results

If you do not click Process Immediately, then you must select the links that you want to verify, and click Verify Selected URLs. If you click Process Immediately, then you skip this step, and Evergreen jumps directly to the results of the verification attempts as seen in the next step.

Link_Checker2

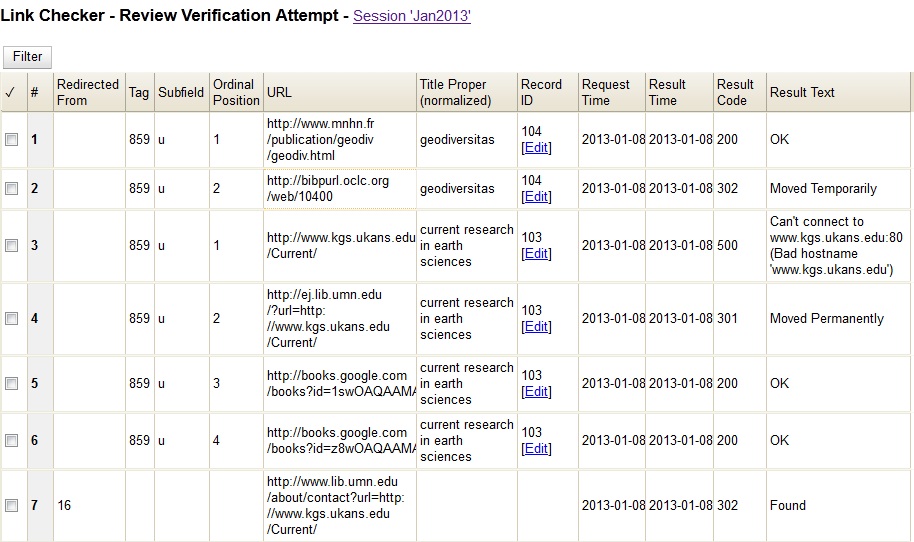
Evergreen displays the results of the verification attempts, including the tags that you searched, the URLs that Evergreen retrieved, the Bib Record ID, the request and result time, and the result code and text.

Link_Checker6

Manage Your Sessions

Edit Columns

You can use the Column Picker to add and remove columns on any of the Link Checker interfaces. To access the Column Picker, right click on any of the column headings. The columns are saved to your user account.

Clone Sessions

You can clone sessions that you run frequently or that have frequently-used parameters that need only minor adjustments to create new searches. To clone a session:

1) Click CatalogingLink Checker.

2) In the Session ID column, click Clone. A copy of the parameters of that search will appear.

View Verification Attempts

To view the results of a verification attempt after you have closed the session, click CatalogingLink Checker. Your link checker sessions appear in a list. To view the results of a session, click the Open link in the Session ID column.

Click Filter to refine the results on this page. To add a filter:

  1. Select a column from the first drop down menu.
  2. Select an operator from the second drop down menu.
  3. A third field will appear. Enter the appropriate text.
  4. Click Apply to apply the filter to your current results. Click Save Filters to save the filter to your user account for later use.

Author: Sally Fortin, Athenaeum Educational Services

Print Friendly
Posted in Uncategorized | Leave a comment

Activate Purchase Order with Zero Copies 2.3

This feature is available in Evergreen version 2.3.

In previous versions, by default, a purchase order could be activated with or without copies attached to line items.

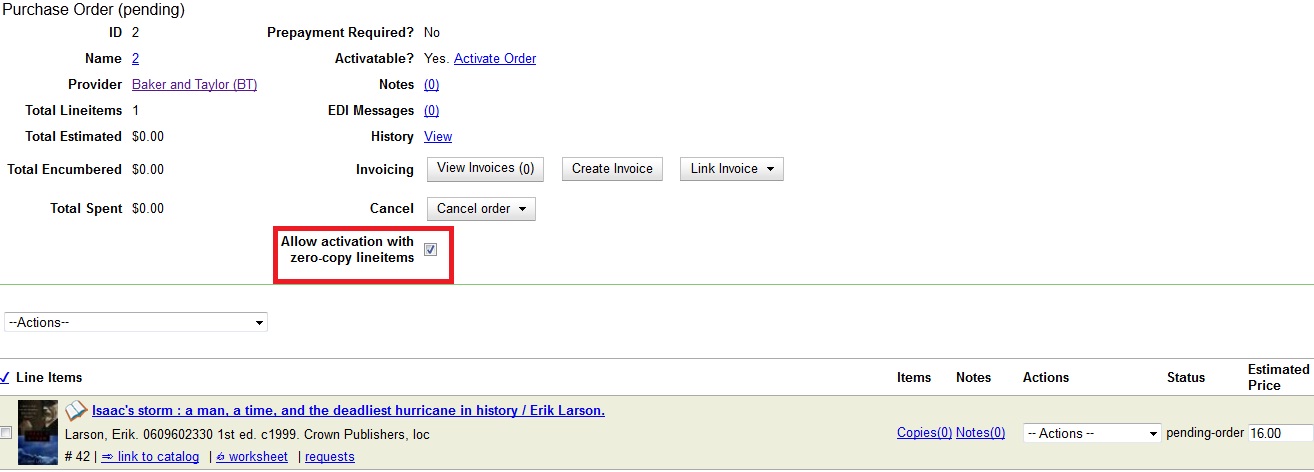
In version 2.3, by default, a purchase order cannot be activated if a line item on the purchase order has zero copies. A new feature enables you to activate a purchase order that lacks copies.

To activate a purchase order with line items that have zero copies, check the box Allow activation with zero-copy lineitems.

Zero_Copies1

Author: Sally Fortin, Equinox Software

Print Friendly
Posted in Uncategorized | Leave a comment