2.5 Lost and Long Overdue Bill Colors


This feature is available in Evergreen version 2.5.

This stylization enhancement distinguishes Lost and Long Overdue circulations that appear within the billed transactions of a patron’s account from other items that are still checked out.

Within the patron’s list of billed transactions, Lost or Long Overdue items, which have not yet been returned, display differently from other items that are still checked out. The color distinctions are applied to the entire row of the billed transaction (previous to version 2.5, only the title of the billed transaction was highlighted). These color enhancements are accompanied by helpful indicators that define the meaning of the colors for staff.

By default, Lost circulations will appear in dark red. The default indicator reads, “Dark Red Items are Lost.”

When the 6 Month Overdue Mark Long-Overdue trigger event definition is enabled, Long Overdue circulations will appear in orange, by default. The default indicator reads, “Orange Items are Long Overdue.”

Billed Transaction Color


Both the color distinctions and indicators are customizable. To customize, a change to circ.css (for the color) and lang.dtd (for the indicator) are required.

Author: Erica Rohlfs, Equinox Software

Print Friendly
Posted in Documentation | Leave a comment

2.5 Sorting Money Columns in Billing Interface

This enhancment is available in Evergreen versions 2.3 -2.5.

This enhancement enables Evergreen to sort money columns numerically in the billing interface. You can perform an ascending or descending sort on these columns.

To view and sort patron bills, retrieve the patron’s account, and click the Bills tab in the top right corner of the screen. You can view the money that is owed or paid in the “Total Billed” and Total Paid columns. Simply click on the headers of these columns to sort the columns numerically.

Author: Sally Fortin, Athenaeum Educational Services

Print Friendly
Posted in Documentation | Leave a comment

2.5 Long Overdue Penalty


This feature will be available in Evergreen version 2.5.

Abstract

Libraries can now configure a penalty for unpaid, long overdue items in Evergreen. When a patron exceeds the allowed number of long overdue items, a penalty will be applied to his or her account. The threshold for the long overdue penalty is configurable by user group. Libraries can set the maximum number of unpaid, long overdue items that a patron can have on his or her account. The threshold can be configured through Admin → Local Administration → Group Penalty Thresholds. Libraries can also configure the actions that are blocked by the long overdue penalty. This can be configured in Admin → Local Administration → Standing Penalties.

As long overdue items are checked in, paid for, or marked lost, the penalty on the patron’s account will be adjusted. If the number of unpaid, long overdue circulations falls below the threshold, the penalty will be removed from the account.

Configure Standing Penalty

The Long-Overdue Penalty can be found and configured in Admin → Local Administration → Standing Penalties. This allows you to configure the actions that are blocked by the penalty. Here you will see a penalty with the name PATRON_EXCEEDS_LONGOVERDUE_COUNT and label Patron Exceeds Max Long-Overdue Threshold.

To edit:

  1. Double click on the penalty. A box will pop up that allows you to configure the penalty.
  2. If desired, you can change the label of this penalty.
    1. The id and name of the penalty are linked to the database and cannot be changed.
  3. The block list defines the actions that a patron will be prevented from performing should this penalty be applied to their account. A patron can be blocked from:
    1. CIRC- circulating an item
    2. FULFILL- checking out an item that is on hold
    3. HOLD- placing a hold on a title
    4. CAPTURE- prevents a patron’s hold from being captured
    5. RENEW- renewing an item
  4. Check the box next to staff_alert if you would like an alert to appear on a patron account when the penalty is applied.
  5. Click Save.

Configure Group Thresholds

The threshold for the Long-Overdue Threshold Penalty can be configured in Admin → Local Administration → Group Penalty Thresholds. Here you can configure the maximum number of long overdue items a patron may have. If a patron exceeds this threshold, the penalty configured in Standing Penalties will be applied.

To configure a new penalty threshold:

  1. Click on New Penalty Threshold. A box will pop up that allows you to configure the threshold.
  2. From the Group dropdown menu, select the user group for which you would like to configure a threshold.
  3. From the Org Unit dropdown menu, select the library that will use this threshold.
  4. From the Penalty dropdown menu, select PATRON_EXCEEDS_LONGOVERDUE_COUNT.
  5. Configure the threshold in the Threshold field.
  6. Click Save to create this Group Penalty Threshold.

Author: Angela Kilsdonk, Equinox Software

Print Friendly
Posted in Documentation | Leave a comment

2.5 Default Values for Vandelay Item Import


This feature is available in Evergreen version 2.5.

Evergreen now supports additional functionality for importing items through CatalogingMARC Batch Import/Export. When items are imported via a Holdings Import Profile in CatalogingMARC Batch Import/Export, Evergreen will create an item-level record for each copy. If an item barcode, call number, copy location, or circulation modifier is not set in the embedded holdings, Evergreen will apply a default value based on the configured Library Settings. A default prefix can be applied to the auto-generated call numbers and item barcodes.

The following Library Settings can be configured to apply these default values to imported items:

  • Vandelay: Generate Default Barcodes—Auto-generate default item barcodes when no item barcode is present
  • Vandelay: Default Barcode Prefix—Apply this prefix to any auto-generated item barcodes
  • Vandelay: Generate Default Call Numbers—Auto-generate default item call numbers when no item call number is present
  • Vandelay: Default Call Number Prefix—Apply this prefix to any auto-generated item call numbers
  • Vandelay: Default Copy Location—Default copy location value for imported items
  • Vandelay: Default Circulation Modifier—Default circulation modifier value for imported items

Author: Angela Kilsdonk, Equinox Software

Print Friendly
Posted in Documentation | Leave a comment

2.5 Patron Self-Registration


This feature will be available in Evergreen version 2.5.

Abstract

Patron Self-Registration allows patrons to initiate registration for a library account through the OPAC. Patrons can fill out a web-based form with basic information that will be stored as a “pending patron” in Evergreen. Library staff can review pending patrons in the staff-client and use the pre-loaded account information to create a full patron account. Pending patron accounts that are not approved within a configurable amount of time will be automatically deleted.

Patron Self-Registration:

  1. In the OPAC, click on the link to Request Library Card.
  2. Fill out the self-registration form to request a library card, and click Submit Registration.
  3. Patrons will see a confirmation message: “Registration successful! Please see library staff to complete your registration.”
Patron Self-Registration form


Managing Pending Patrons:

  1. In the staff client select CirculationPending Patrons.
  2. Select the patron you would like to review. In this screen you have the option to Delete a pending patron account or Load the pending patron information to create a permanent library account.
  3. To create a permanent library account for the patron, click on the patron’s row, right-click and select Load Patron or click on the Load Patron button at the top of the screen. This will load the patron self-registration information into the main Patron Registration form.
  4. Fill in the necessary patron information for your library, and click Save to create the permanent patron account.

Library Settings

Three new Library Settings have been created to manage patron self-registration:

  • OPAC: Allow Patron Self-Registration must be set to ‘True’ to enable use of this feature.
  • OPAC: Patron Self-Reg. Expire Interval allows each library to set the amount of time after which pending patron accounts should be deleted.
  • OPAC: Patron Self-Reg. Display Timeout allows each library to set the amount of time after which the patron self-registration screen will timeout in the OPAC. The default is 5 minutes.

Several existing Library Settings can be used to determine if a field should be required or hidden in the self-registration form:

  • GUI: Require day_phone field on patron registration
  • GUI: Show day_phone on patron registration
  • GUI: Require dob (date of birth) field on patron registration
  • GUI: Show dob field on patron registration
  • GUI: Require email field on patron registration
  • GUI: Show email field on patron registration
  • GUI: Require State field on patron registration
  • GUI: Show State field on patron registration
  • GUI: Require county field on patron registration
  • GUI: Show county field on patron registration [New Setting]

Several existing Library Settings can be used to verify values in certain fields and provide examples for data format on the registration form:

  • Global: Patron username format
  • GUI: Regex for phone fields on patron registration OR GUI: Regex for day_phone field on patron registration
  • GUI: Regex for email field on patron registration
  • GUI: Regex for post_code field on patron registration
  • GUI: Example for email field on patron registration
  • GUI: Example for post_code field on patron registration
  • GUI: Example for day_phone field on patron registration OR GUI: Example for phone fields on patron registration

Author: Angela Kilsdonk, Equinox Software

Print Friendly
Posted in Documentation | Leave a comment

2.5 Alternate Hold Pick up Location


This feature is available in Evergreen version 2.5

Abstract

This feature enables libraries to configure an alternate hold pick up location. The alternate pick up location will appear in the staff client to inform library staff that a patron has a hold waiting at that location. In the stock Evergreen code, the default alternate location is called “Behind Desk”. This label can be changed to accommodate a library’s specific hold pick up location. For example, if a library has a drive thru window for hold pick up, the alternate location can be changed to display as “Drive Thru”.

Configuration

The alternate pick up location is disabled in Evergreen by default. It can be enabled by setting Holds: Behind Desk Pickup Supported to True in the Library Settings Editor. Server side changes to configuration files are required to enable this feature and edit the alternate pick up location label. The following files and labels need to be changed:

  • Open-ILS/src/templates/opac/myopac/prefs_settings.tt2 <td><label for=[% setting %]>[% l(Pickup holds from the drive-thru when possible?) %]</label></td>
  • Open-ILS/web/opac/locale/en-US/lang.dtd <!ENTITY staff.patron_display.holds_available_behind_desk.label Drive-Thru:>
  • Open-ILS/xul/staff_client/server/locale/en-US/circ.properties staff.circ.utils.hold.behind_desk=Drive-Thru
  • Open-ILS/xul/staff_client/server/locale/en-US/patron.properties staff.patron.summary.hold_counts_behind_desk=Available / Total (Drive-Thru)

Libraries can also choose to give patrons the ability to opt-in to pick up holds at the alternate location through their OPAC account. To add this option, set the OPAC/Patron Visible field in the User Setting Type Hold is behind Circ Desk to True. The User Setting Types can be found under *Admin → Server Administration → User Setting Types.

Display

When enabled, the alternate pick up location will appear in several places in the staff client. The alternate pick up location and the number of items that are ready for pick up at that location will be displayed in the Patron Account Summary and under the Holds button in the patron account. Staff will also see the general number of holds available and holds placed by the patron.

Custom Hold Pickup Location


If configured, patrons will see the option to opt-in to the alternate location in the Account Preferences section of their OPAC Account.

OPAC Account

Author: Angela Kilsdonk, Equinox Software

Print Friendly
Posted in Documentation | Leave a comment

2.5 Catalog Browse


This feature is available in Evergreen version 2.5.

Abstract

Catalog Browse enables you to browse bibliographic headings available in your catalog. You can click the hyperlinked bibliographic headings to retrieve catalog records that contain these headings. Also, if a given bibliographic heading is linked to an authority record, and if that authority is linked to another one via the first authority’s See and See Also tags, the additional variants of (e.g.) an author’s name will appear in your search results.

Use Catalog Browse

  1. To access this feature, navigate to the catalog search page, and click the link, Browse the Catalog. By default, you can browse by title, author, subject, or series. System administrators can revise this list by editing the file at the location opac/parts/qtype_selector.tt2, and they can even make use of custom indices based on defintions in the database’s config.metabib_field table.
  2. Enter a term or part of a term to browse. Evergreen will retrieve a list of bibliographic headings that match your query. Click the Back and Forward buttons to page through you results. To limit your browse results to a specific branch or copy location group, select the appropriate unit from the drop down menu, and click Go.
  3. Select a link from the search results. Each linked heading displays the number of bibliographic records associated with the heading. Appropriate information from linked authority records, if any, appears below the main entry heading.
  4. To return to your list of results, click the browser’s back button or Browse the Catalog. Evergreen will return you to your previous position in your list of results.

Administration

A new global flag warns users when they are entering a browse term that begins with an article. Systems administrators can create a regular expression to configure articles matched with specific indices that would prompt a warning for the user. By default, this setting is not enabled.

  1. To enable this feature, click AdminServer AdministrationGlobal Flags.
  2. Double click Map of search classes to regular expressions to warn user about leading articles.
  3. Make changes, and click Save.

Author: Sally Fortin, Athenaeum Educational Services

Print Friendly
Posted in Documentation | Leave a comment

2.5 Z39.50 Search Enhancements


Abstract

In Evergreen version 2.5, you will be able to search multiple Z39.50 sources simultaneously from record buckets. Using this feature, you can match records from Z39.50 sources to catalog records in your bucket and import the Z39.50 records via Vandelay. Note that additional documentation for Vandelay can be found in the Evergreen Community’s Official Documentation located at

http://docs.evergreen-ils.org/

or in Equinox Software Inc’s documentation located at

http://www.esilibrary.com/esi/availableDocs.php

Administration

The following administrative interfaces will enable you to configure Z39.50 search parameters.

Z39.50 Index Field Maps

Click AdminServer AdministrationZ39.50 Index Field Maps to map bib record indexes (metabib fields and record attributes) in your catalog records to Z39.50 search attributes. Metabib fields are typically free form fields found in the body of a catalog record while record attributes typically have only one value and are often found in the leader.

You can map a metabib field or a record attribute to a Z39.50 attribute or a Z39.50 attribute type. To map a specific field in your catalog record to a specific field in a chosen Z39.50 source, you should map to a Z39.50 attribute. For example, if you want the Personal Author in your catalog record to map to the Author field when searching the Library of Congress, then you should do the following:

  1. Click New or double-click to edit an existing map.
  2. Select the Metabib Field from the drop down menu.
  3. Select the appropriate source and field from the Z39.50 Attribute drop down menu.
  4. Click Save.

Alternatively, if you want the Personal Author in your catalog record to map to the generic author field of any Z39.50 source, then you should do the following:

  1. Click New or double-click to edit an existing map.
  2. Select the Metabib Field from the drop down menu.
  3. Select the appropriate heading from the Z39.50 Attribute Type drop down menu.
  4. Click Save.

Z39.50 servers

Click AdminServer AdminZ39.50 Servers to input your Z39.50 server. Click the hyperlinked name of any server to view the Z39.50 search attribute types and settings. These settings describe how the search values (from a metabib field or record attribute) are translated into Z39.50 searches.

Apply Quality Sets to Z30.50 Sources

From this interface, you can rank the quality of incoming search results according to the match set that you have established and their Z39.50 point of origin. By applying a quality score, you tell Evergreen to merge the highest quality records into the catalog.

  1. Click CatalogingMARC Batch Import/Export.
  2. Click Record Match Sets. Match Sets specify the MARC attributes, tags, and subfields that you want Evergreen to use to identify matches between catalog and incoming records.
  3. Rank the quality of the records from Z39.50 sources by adding quality metrics for the match set. Click MARC Tag and Subfield, and enter the 901z tag and subfield, specify the Z39.50 source, and enter a quality metric. Source quality increases as the numeric quality increases.
Locate_Z39.50_Matches4

Org Unit Settings

Org Unit settings can be set for your local branch, your system, or your consortium. To access these settings, click AdminLocal AdministrationLibrary Settings EditorMaximum Parallel Z39.50 Batch Searches.

Two new settings control the Z39.50 search enhancements.

  1. Maximum Parallel Z39.50 Batch Searches – This setting enables you to set the maximum number of Z39.50 searches that can be in-flight at any given time when performing batch Z39.50 searches. The default value is five (5), which means that Evergreen will perform 5 searches at a given time regardless of the number of sources selected. The searches will be divided between the sources selected. Thus, if you maintain this default and perform a search using two Z39.50 sources, Evergreen will conduct five searches, shared between the two sources.
  2. Maximum Z39.50 Batch Search Results – This setting enables you to set the maximum number of search results to retrieve and queue for each record + Z39 source during batch Z39.50 searches. The default value is five (5).

Matching Records in Buckets with Records from Z39.50 Sources

  1. Add records to a bucket.
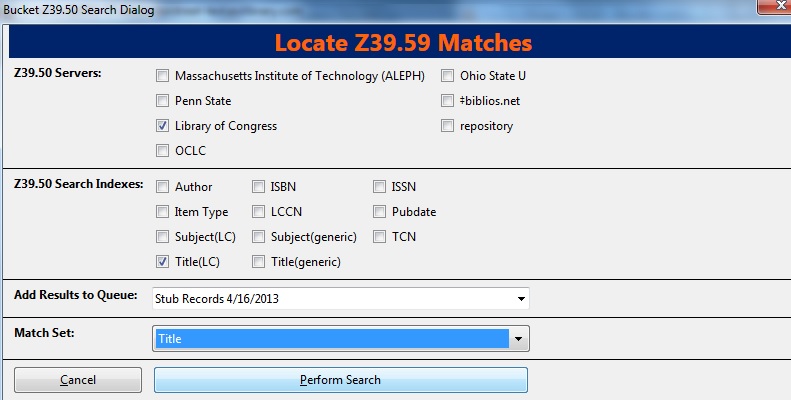
  2. Click Bucket ActionsLocate Z39.50 Matches. A pop up window will appear.
  3. Select a Z39.50 Server(s).
  4. Select a Z39.50 Search Index(es). Note that selecting multiple checkboxes will AND the search indexes.
  5. Select a Vandelay queue from the drop down menu to which you will add your results, or create a queue by typing its name in the empty field.
  6. Select a Match Set. The Match Set is configured in Vandelay and, in this instance, will only be used to compare the Z39.50 results with the records in your bucket.
  7. Click Perform Search.
Locate_Z39.50_Matches1
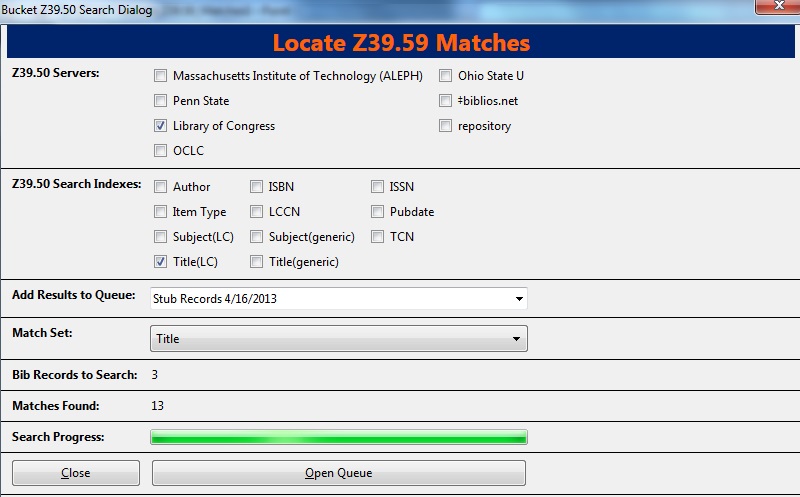
  1. Status information will appear, including the number of records in the bucket that were searched, the matches that were found, and the progress of the search. When the search is complete, click Open Queue.
Locate_Z39.50_Matches2
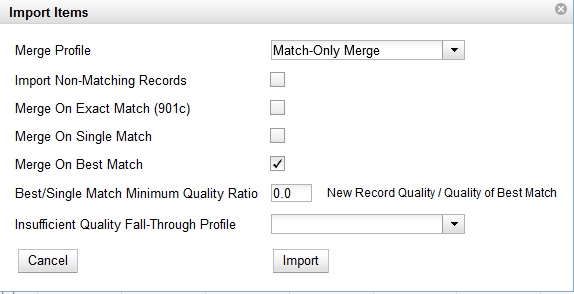
  1. The Vandelay Queue will display. Matching records are identified in the Matches column. From this interface, import records according to your normal procedure. It is suggested that to merge the incoming records with the catalog records, you should choose an option to import the records. Next, select either merge option from the drop down menu, click Merge on Best Match, and then click Import.
Locate_Z39.50_Matches3
  1. The records from the Z39.50 search will merge with the catalog records. NOTE: A new column has been added to this interface to identify the Z39.50 source. When records are imported to the Vandelay queue via a record bucket, Evergreen tags the Z39.50 source and enters the data into the $901z.

Author: Sally Fortin, Athenaeum Educational Services

Print Friendly
Posted in Documentation | Leave a comment

2.4 Storing Z39.50 Server Credentials


This feature is available in Evergreen version 2.4.

Staff have the option to apply Z39.50 login credentials to each Z39.50 server at different levels of the organizational unit hierarchy. Credentials can be set at the library branch or system level, or for an entire consortium. When credentials are set for a Z39.50 server, searches of the Z39.50 server will use the stored credentials. If a staff member provides alternate credentials in the Z39.50 search interface, the supplied credentials will override the stored ones. Staff have the ability to apply new credentials or clear existing ones in this interface. For security purposes, it is not possible for staff to retrieve or report on passwords.

To set up stored credentials for a Z39.50 server:

  1. Go to Admin → Server Administration → Z39.50 Servers.
  2. Select a Z39.50 Source by clicking on the hyperlinked source name. This will take you the Z39.50 Attributes for the source.
  3. At the top of the screen, select the org unit for which you would like to configure the credentials.
  4. Enter the Username and Password, and click Apply Credentials.
Storing Z39.50 Credentials

Author: Angela Kilsdonk, Equinox Software

Print Friendly
Posted in Documentation | Leave a comment

2.5 Mark an Item Long Overdue

This feature is available in Evergreen version 2.5.

Marking an item Long Overdue

Once an item has been overdue for a configurable amount of time, Evergreen will mark the item long overdue in the borrowing patron’s account. This will be done automatically through a Notification/Action Trigger. When the item is marked long overdue, several actions will take place:

  1. The item will go into the status of “Long Overdue”
  2. The item will be moved to the “Lost, Claimed Returned, Long Overdue, Has Unpaid Billings” section of the Items Out screen in the patron’s account
  3. The accrual of overdue fines will be stopped

Optionally the patron can be billed for the item price, a long overdue processing fee, and any overdue fines can be voided from the account. Patrons can also be sent a notification that the item was marked long overdue.

Patron Account-Long Overdue

Checking in a Long Overdue item

If an item that has been marked long overdue is checked in, an alert will appear on the screen informing the staff member that the item was long overdue. Once checked in, the item will go into the status of “In process”. Optionally, the item price and long overdue processing fee can be voided and overdue fines can be reinstated on the patron’s account. If the item is checked in at a library other than its home library, a library setting controls whether the item can immediately fill a hold or circulate, or if it needs to be sent to its home library for processing.

Long Overdue Checkin


Notification/Action Triggers

Evergreen has two sample Notification/Action Triggers that are related to marking items long overdue. The sample triggers are configured for 6 months. These triggers can be configured for any amount of time according to library policy and will need to be activated for use.

  • Sample Triggers
    • 6 Month Auto Mark Long-Overdue—will mark an item long overdue after the configured period of time
    • 6 Month Long Overdue Notice—will send patron notification that an item has been marked long overdue on their account

Library Settings

The following Library Settings enable you to set preferences related to long overdue items:

  • Circulation: Long-Overdue Check-In Interval Uses Last Activity Date—Use the long-overdue last-activity date instead of the due_date to determine whether the item has been checked out too long to perform long-overdue check-in processing. If set, the system will first check the last payment time, followed by the last billing time, followed by the due date. See also circ.max_accept_return_of_longoverdue
  • Circulation: Long-Overdue Items Usable on Checkin—Long-overdue items are usable on checkin instead of going “home” first
  • Circulation: Long-Overdue Max Return Interval—Long-overdue check-in processing (voiding fees, re-instating overdues, etc.) will not take place for items that have been overdue for (or have last activity older than) this amount of time
  • Circulation: Restore Overdues on Long-Overdue Item Return
  • Circulation: Void Long-Overdue item Billing When Returned
  • Circulation: Void Processing Fee on Long-Overdue Item Return
  • Finances: Leave transaction open when long overdue balance equals zero—Leave transaction open when long-overdue balance equals zero. This leaves the lost copy on the patron record when it is paid
  • Finances: Long-Overdue Materials Processing Fee
  • Finances: Void Overdue Fines When Items are Marked Long-Overdue

Permissions to use this Feature

The following permissions are related to this feature:

  • COPY_STATUS_LONGOVERDUE.override
    • Allows the user to check-in long-overdue items thus removing the long-overdue status on the item

Author: Angela Kilsdonk, Equinox Software

Print Friendly
Posted in Documentation | Leave a comment